Powered By Blogger

Monday, February 1, 2016

Build Process Parameters are not loading while queuing the build

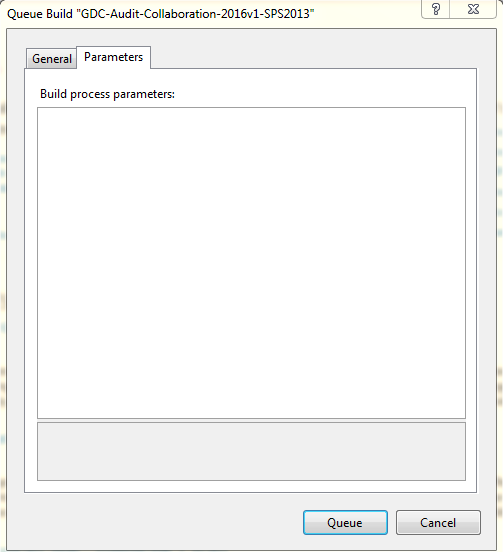
Issue: Build Process Parameters are not loading while queuing the build
Solution: Update VS 2013 with Update 1 or later versions.

New technology improvements and fixed issues in Visual Studio 2013 Update 1
Fixed issues
·         Team Foundation Server
o   Build
You cannot change the process parameters in the Queue Build dialog box in Visual Studio 2013.


After Updating VS2013 Update 5


Friday, January 23, 2015

maintaining TFS workspace on Machine Name change

If your Build machine name changes, you will not be able to use your old workspace in TFS.
In that case you can recover the same by updating TFS using /updateComputerName switch.
This Instructs Team Foundation to update its tables to reflect a change in the name of a client computer. If you specify this option, you must also specify a team project collection by using the /collection option.

"C:\Program Files (x86)\Microsoft Visual Studio 11.0\Common7\IDE\TF.exe" workspaces /collection:http://myserver:8080/tfs/DefaultCollection  /updateComputerName:OldComputerName

Ex:
"C:\Program Files (x86)\Microsoft Visual Studio 11.0\Common7\IDE\TF.exe" workspaces /collection:http://tfsRVN:8080/tfs/RAHULN_Others /updateComputerName: RAHULN


Setting up Visual Studio 2012 for SharePoint 2013


In a clean server, the user must be installing Visual Studio 2012 and Sharepoint 2013 for developing Sharepoint applications.
But once you open you will notice that there is no option in Visual Studio 2012 to create Sharepoint project\applications.


To get the sharepoint templates into Visual Studio, you need to install Microsoft Office Developer Tools for Visual Studio 2012


But for this, we require Microsoft Web Platform Installer and unfortunately, this won’t be available in restricted internet access of our environment.

So download and install Microsoft Web Platform Installer.
And from this we can install Web Developer Tools, in case it’s not available, download Microsoft ASP.NET and Web Tools 2013.1 RC (web developer Tool) and install prior to Microsoft Office Developer Tools for Visual Studio 2012


But If you try to create a SharePoint 2013 project and you get the following error message:


Error
“An error occurred while trying to load some required components.
Please ensure that the following prerequisites components are installed:
Microsoft Web Developer Tools
Microsoft Exchange Web Service.”

The problem is that the Microsoft Web Platform Installer adds parameters when installing the Microsoft Exchange Web Services that must be used in order to get around the error. If you have already installed the Microsoft Exchange Web Services, uninstall it from Control Panel and then open up a command prompt
Run command as:
EwsManagedApi.msi addlocal="ExchangeWebServicesApi_Feature,ExchangeWebServicesApi_Gac"

Download msi for Microsoft Exchange Web Services API 2.0 and Open command prompt


Sunday, September 14, 2014

StyleCop Integration with csproj and MSBuild

StyleCop Integration with csproj and MSBuild.

Step 1. Install StyleCope 4.7
Step 2: Update .csproj by adding 
                <Import Project="$(ProgramFiles)\MSBuild\StyleCop\v4.7\StyleCop.Targets" />
                ----------------
                </Project>
Step 3: Add the below Tag under   <PropertyGroup> to Treat Stylecop Warnings as Errors
<StyleCopTreatErrorsAsWarnings>false</StyleCopTreatErrorsAsWarnings>
                </PropertyGroup>
Step 4: By default, the "Merge with settings file found in parent folders" option is selected. StyleCop will continue searching above the current directory for additional parent settings files.


Step 5: Rather than merging with a settings file found within a parent directory, it is also possible to provide an explicit link to another settings file to merge with.


Step 6: Build csproj with MSBuild:


NOTE: If we are implementing Stylecop, we should edit all csproj before building the same. also there is no direct logging mechanism for StyleCop.
So Personally I will recommend FxCop instead of StyleCop.

SAP ABAP static code analysis using Fortify SCA

Description: ABAP is one of the many application-specific fourth-generation languages. It was originally the report language for SAP R/2, a platform that enabled large corporations to build mainframe business applications for materials management and financial and management accounting.

Our Problem: Whether Fortify supports ABAP?
Yes, Fortify Supports ABAP.
How we can achive and create Fortify Reports?
get .abap files to be scanned. If you are getting txt files, then change the extension to .abap.
Now apply below commandlines to generate frp.


"C:\Program Files\HP_Fortify\HP_Fortify_SCA_and_Apps_4.00\bin\sourceanalyzer.exe" -b abapSample -clean

"C:\Program Files\HP_Fortify\HP_Fortify_SCA_and_Apps_4.00\bin\sourceanalyzer.exe" -b abapSample myABAPfile.abap


"C:\Program Files\HP_Fortify\HP_Fortify_SCA_and_Apps_4.00\bin\sourceanalyzer.exe" -b abapSample -scan -f myABAPfile.fpr

From .frp file, you can generate Report as xml and  pdf files.

"C:\Program Files\HP_Fortify\HP_Fortify_SCA_and_Apps_4.00\bin\ReportGenerator.bat" -format xml -f "myABAPfile_Report.xml" -source  “myABAPfile.fpr"

"C:\Program Files\HP_Fortify\HP_Fortify_SCA_and_Apps_4.00\bin\ReportGenerator.bat" -format pdf -f "myABAPfile_Security_Report.pdf" -source "myABAPfile.fpr"

"C:\Program Files\HP_Fortify\HP_Fortify_SCA_and_Apps_4.00\bin\ReportGenerator.bat" -format pdf -template "C:\Program Files\HP_Fortify\HP_Fortify_SCA_and_Apps_4.00\Core\config\reports\DeveloperWorkbook.xml" -f "myABAPfile_Developer_Workbook.pdf" -source "myABAPfile.fpr"

"C:\Program Files\HP_Fortify\HP_Fortify_SCA_and_Apps_4.00\bin\ReportGenerator.bat" -format pdf -template "C:\Program Files\HP_Fortify\HP_Fortify_SCA_and_Apps_4.00\Core\config\reports\ScanReport.xml" -f "myABAPfile_Scan_Summary.pdf" -source "myABAPfile.fpr"

Wednesday, August 6, 2014

Customized Logs for msi

For writing customized Logging in default msi logs.
You can implement this using either a vb script or an installscript.
Below is a sample log which I created in between creating IIS WEBSITE and APP using APPCMD.

MSI (s) (A0:98) [11:02:47:417]: Hello, I'm your 32bit Impersonated custom action server.
Action start 11:02:47: callthis.
Custom Log: 7/11/2014 11:02:47 AM : Creating Site TestThisSite...
Custom Log: 7/11/2014 11:02:51 AM : Creating App WebUI under Site TestThisSite...
MSI (s) (A0:6C) [11:02:51:472]: Doing action: FindRelatedProducts
Action ended 11:02:51: callthis. Return value 0.

All you want to do is to include the below Function in your code.

InfoMessage “Here is my log”

Sub InfoMessage (MsgText)
            Const msiMessageTypeInfo = &H04000000
            Set oRec = session.Installer.createRecord(1)
            oRec.StringData(0) = "Custom Log: " & Now() & " : [1]"
            oRec.StringData(1) = MsgText
            Session.Message msiMessageTypeInfo, oRec
            Set oRec = Nothing
End Sub

Resolved: Cannot connect to WMI provider. You do not have permission or the server is unreachable

Open cmd as administrator:
Run MOF Compiler by passing below parameter as:

mofcomp "%programfiles%\Microsoft SQL Server\100\Shared\sqlmgmproviderxpsp2up.mof"


what is MOFcomp: 
The Managed Object Format (MOF) compiler parses a file containing MOF statements and adds the classes and class instances defined in the file to the WMI repository. MOF files are usually automatically compiled during the installation of the systems with which they are provided, but you can also compile MOF files by using this tool.

Microsoft SQL Server 2012       110
Microsoft SQL Server 2008 R2  100
Microsoft SQL Server 2008       100
Microsoft SQL Server 2005       90

Open services.msc
Restart Windows management Instrumentation WMI Service